Pages

Friday, November 29, 2013

Mad About Scrappin - Layout of the Week - Week 24

 
Back again to share with you the last layout for this month I have created for Mad About Scrappin.
 
I have used up the last of my Teresa Collins - Memorabilia stash to create this layout to share with you this week.
 I have played around with using a piece of the Memorabilia paper range as the main background for my layout this week. I am not usually one to use a whole sheet of double sided patterned paper as the base of my layout. However this week I decided that I would do so as I had saved this background paper whole to use for a base when I first saw it. It was just too nice to cut up. So this week I decided to go with a school theme for my layout as I feel this paper range works really well with that theme.

To continue with the school theme I have randomly stamped the base patterned paper with a Kaisercraft numerical clear stamp. I used my hand to stamp rather that a stamp block because I didn't want the whole  pattern. I just wanted to give the base paper a more textured feel. I then used my trusted favourite washi tapes to give the paper a bit of a border to break it up a little.
 
 By layering the die cuts that match the Memorabilia paper range with some washi tape and masking tape I have been able to create my own matching embellishments. I love that the die cuts are double sided and that you are able to chose if you want to use the coloured or black and white side. Makes the die cuts quite versatile.
 
Now.. as I had said above I have used some making tape on this layout as part of my embellishments. Well.. it order to tie it all in I have used the Kaisercraft numerical stamp again to alter the masking tape. The masking tape on its own just didn't fit I felt. Plus the added bonus is that the masking tape adds to the school feel.
 
Have you used something on your layout that was a little different ?
 
Why not play around and see what you come up with.
 
Till next week.
 
TFL, Michelle x
Photobucket

Wednesday, November 27, 2013

Photobucket
Hi, I am here today to show you what I create with Kaisercraft Tea Break Collection. I have to say with 3 daughters this collection was perfect for me.
I made 3 layouts and have lots leftover for cards!!! Awesome value. I will say sorry for the photos as they are slightly out of focus but nothing I was doing was changing it. Here are the 3 layouts:


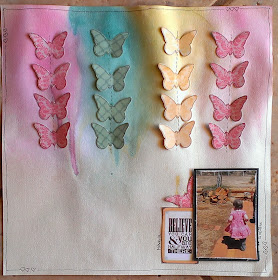
This is of my youngest daughter when she was really starting to walk around.


I used a butterfly die and die machine to cut out all the butterflies from the 3 colours I wanted. I also misted the background in 3 colours roughly the same as the butterflies. I outlined the butterflies and drew black lines through them.

The Tea Break comes with a whole heap of die cuts. I used one as my title, another butterfly and a bit of extra info and layout done. 


This is my middle daughter on her birthday.


I used a Kaisercraft stamp for the background, another Die Cut for title and loads of flowers from the shop plus the ribbon is from there as well.


The Die Cut that you just see sticking out as some journaling on it that I did not want shown.


The banner was made using a flag die and die cutting machine.
And last:


Again its of my middle daughter


These butterflies are from the Heidi Swapp stencil (its on sale if you want one) I used a ink then drew around each one and added pearls


With the collection there is a sticker sheet. I used a few words and the banner from it


Again used the Die Cuts as a title and more flowers from the shop.
Well that's it from me. I will be back next week showing you some cards I made with the leftovers from this collection. If you want to buy this awesome range head HERE and get yours while stock last.
Thanks for looking
Belinda

Monday, November 25, 2013

Altered Cassette Case


Hi everyone, back again with another project to share with you all.  I found this really cool idea on Pinterest one night whilst I was browsing from my phone.  I wish I had pinned it to one of my boards, because when I went to try and find it again I couldn't.  I have seen a lot of these old cassette cases transformed into gorgeous stickpin holders, but not that many to hold a your mobile phone, ipod or similar devices.


I have used  the lovely Miss Match papers from Kaisercraft and totally covered all sides of the case.


 I have embellished it with some of the lovely Coral Lillies and some white 1cm Roses.  I have added a string of the ivory pearl bead trim and some fine off white lace.


I have quite a few of the cases stashed out in the shed.  I think I will be dusting them off to create some more for Christmas gifts.  Thanks for joining me today.  
Till next time remember to .....
.....✿ღ.~♥  Live your Bliss ♥~ღ.✿
Photobucket

Saturday, November 23, 2013

November Sketch Challenge

Photobucket


Hi, I am here today to show you my take on Anne Patterson Sketch. I have to say I LOVED doing this sketch and has to be one of my fav layouts that I have done this yr. Since it was an Anne Patterson sketch I was going to do stitching, but in the end decided against it and went with doodling.

Here is the sketch:


And here is my take:


The sketch just screamed to me to use a photo of each of my girls. I have used one of the new Kaisercraft stamps (they are sold out ) and stamped in the area of where the paper squares were going. I also lightly misted.


The paper range I used is Fancy Pants 'Collecting Moments' (Head here to find in store) The butterflies are from the range, I used a die and my die machine to cut them out.


The squares are 4x4. After distressing the edges I used black pen and doodled around each one.


The title is from Jilibean Soup (Head here to find them). 

Thanks it for me today,

Thanks for looking

Belinda :)

Friday, November 22, 2013

Mad About Scrappin - Layout of the Week - Week 23

Hello all.
 
Back this week to share with you a quick layout I have created using the Memorabilia paper range by Teresa Collins available at Mad About Scrappin.
 
Still love the versatility of this paper range. Love how it can be used for any subject matter.
 
And I must say that I quite love the colours in this paper range too.
 
So here's the layout that I have created this week.
This time around I have used a piece of smooth black card stock that I have had laying around in my stash for a while. I usually use this type of card stock mainly for matting my photos. However this time around I have found it has worked well for what I wanted to do with the base on my card stock. By also adding a border of some matching washi tape I have been able to create a different feel to finish off the edges of the layout without any huge effort involved.

 For my base design on the black card stock I have used a stencil by WOW I purchased from a Mad About Scrappin Flog it Friday sale. Rather than using it with mists of texture paste however I have used it with and ink pad. To be able to get the ink onto the card stock I have used a disposable cotton makeup pad to rub ink onto the card stock over the stencil. I was able to control the amount I was putting on the card stock quite easily this way. I was also able to fade it in and out of the stencil as I desired. Then lastly to add a little more dimension I have then stamped the stencil using a script stamp randomly. I am quite happy with this effect.

I love being able to layer things I want on the layout too. for this layout I have used a really yummy envelope by Bo Bunny available to Mad About Scrappin. Then I have stamped a piece of the lighter Memorabilia paper with the same script stamp I used on the base card stock. This helped to tie it all together as I found the paper was a little too pale for this layout without it. I even managed to squeeze a piece of felt border punched floral ribbon into this layout that I have had laying around in my to use up stash for ages.
 
Why not play around with your stash too. I love being able to use old products up with new items I have purchased.
 
Till next week.
 
TFL, Michelle x
Photobucket

Wednesday, November 20, 2013

November challenge!

Hello! 
Renee here with my take on the November sketch but the gorgeous Anne Patterson :)

and here is my take on it :)

Me & My Littlies 


This sketch is perfect for using up bits and bots of left over patterned paper, or you may even want to dabble in the project life style layout.

Would love to see your take on this sketch :)
Luv Renee
xoxo
Photobucket

Tuesday, November 19, 2013

It's beginning to look a lot like Christmas!

Hi everyone!!
Today I'm sharing with you the first of my Christmas projects. Can you believe it's nearly here already!! Only 14 days to go! 
Now I must admit I'm not much of a Christmas scrapper, we are always to bleary eyed and frantic on Christmas morning for photos, and at lunch time we are far too busy eating! So when Leanne asked me to use the Simple Stories - December Documented range I was a bit bewildered on what I would do! 

So I decided to think outside the box - and create a '12 days of Christmas' advent box! We will be travelling for most of December, so rather than a traditional advent calendar, I needed to come up with something more versatile

And here it is...

Inside there are 12 little compartments which I will fill with goodies for my girls to open as we count down to Christmas.


My hope is that we will start our own special new Christmas tradition, and that we will be able to use this for many years to come! 

Thanks for stopping by, 
Big loves, 
Tam x


Photobucket

Monday, November 18, 2013

November Layout Challenge - Kimi

Hello readers,  I am back to share with you all my layout for the November sketch challenge.  It has been awhile since I did a layout and I have to admit to being a little out of practice with them.  However, having said that I was totally inspired by this months sketch by Anne Patterson and also the papers that I received in my kit.

For my base I have used My Minds Eye -  The Sweetest Thing - Lavender - "The Best"  Pattern Paper.  I wanted to stick to the sketch as much as possible, but ..... wellll..... instead of squares I saw, Hexagons!!  I cut these from the basic shape files in my cricut.  The first layer was cut from Honey - "One of a Kind" and I used the dark side.  I then layered them with the brighter prints from:-

I then gathered some contrasting embellishments from my stash and played around with their placement

 Once I was happy with how everything looked I glued it all into place... I felt it was missing something so I grabbed my mask and added a little texture paste here and there.....
 ...I also added some rub-ons and inked up the edge with some black ink.
I love how this came together and using the sketch made it super easy and quick!!  I tried really hard to stick to the sketch as closely as possible....really I did ;)

Hope you are all having a scrappy happy day.  Thanks for stopping by....see you all again soon
.....✿ღ.~♥  Live your Bliss ♥~ღ.✿
Photobucket