
Using our Inspiration Pack and the Elise Rebel Paper from 7 Dot Studio DT Leah Cameron has done a step by step tutorial!

Pretty scary stuff for a plain and simple scrapper like me! The best way I know how to use "stuff" like this is to create a background for my layout. So I grabbed out my texture paste, some paint and went to it!

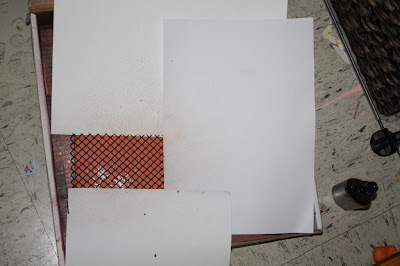
I don't know if it is just me, but I find creating this way is a whole lot of trial and error - usually with me more error than trial! I thought this would look great with a subtle orange texture of dots over it, but the orange paint I have is too bright. The solution to this would be to add just a tad of black to darken it off, right? Yes, with the operative word being "tad"....obviously I added way too much, so have ended up with brown. Oh well, trial and error! I just mixed the paint in with the texture paste, then used the orange rubbery dotty thing (yes, that is the technical term for this item) as a mask and painted the paste mixture over. It took a little while to dry, but the texture and effect is great.

I had some of the mixture left over, so grabbed the bottle lid and pressed it into the paste and used it as a stamp randomly over the background. This works well with just paint or glimmermist as well.

It is amazing what you find in your stash that matches certain papers when you go delving through...I found some silver paint that I thought would look great with the 7 Dots Studio Elise Rebel Collection papers I was using. I dabbed the bubblewrap in the paint and just pressed in a few areas around the page.

A trick that I often do is to frame my background paper in a contrasting colour. I find this really lifts a layout and can make the difference between a so/so layout to one that is really eye catching. To save paper, I often cut out the background of the base piece of paper to use on another layout. I usually cut the middle square 11" x 11" or 10 1/2" x 10 1/2" (depending on the size of the photo I am using).

I am not sure if I should admit this in blogworld or not, but I am not a real big glimmermist fan. There, I have said it. The way I like it best is to just do a very small portion of it, not let the whole layout be squirted. To do this on this layout, I mask out the majority of the paper, leaving only a small portion that I want the glimmermist to be able to land on. I used the meshy stuff (you see, I am good at this!) to use as a mask. This actually came up quite well, but I was probably a little too subtle with this as it is difficult to see in the layout. A good technique to use another time, though, I think
I also sanded the edge of my photo with the sandpaper from the inspiration pack, and I distressed and inked the papers to suit the grungy style of the layout. I printed out some journalling, added some washi tape, stamping and some rub-ons from my stash which just happened to match perfectly.


The 7 Dots Studio Elise Rebel Collection papers from Mad About Scrappin' are great to work with. They are a very thick paper and were great to distress. The other interesting thing, which I believe is a great idea, is the way the different papers in the range co-ordinate together. I like that the back side of the papers don't necessarily match best with the other side, but with other pieces in the range. I think this could work really well to get the most out of your papers - I don't know how many times I have wanted to use both sides of the one piece of paper but just have to choose one or the other. The Elise Rebel Collection overcomes this really well, and you can still contrast the pieces if you want. Very clever.
Pin It Now!
1 comment:
Amei isso!
Inspirador a idéia lançada.:)
Post a Comment