Thursday, December 13, 2012

Some more inspiration for you......

I would not claim I am the best of card makers, You would think that a card would be easier then a layout due to having a smaller surface to work on, but I struggle really badly, maybe I could use the excuse that I don't have some of those gorgeous stamps people tend to use. Mmmmm do you think I could use that as an excuse to buy some!!!!!!
 
 
Here is the card I made for my son's 14th birthday, This paper range is really quite fun
ky for boys of 14, though I must admit it has two really different ranges on the opposite sides of the papers.

Here is my layout titled Water Boy, this is of Jordan years ago when we went camping, I love the pattern on this paper which is a bit distressed. I'm also LOVING the chipboard, Yummy!!!

 
On this layout titled "enjoy Bickys" I used some of the paper to make handmade flowers. I loved the banner that was on my backing paper. It is one of those papers that didn't need alot added to it. Loved this paper range. Hope this has offered some inspirations.
 
 
Photobucket
Pin It Now!

Monday, December 10, 2012

In love with My Mind's Eye !!!

Back again to share with you all my last bit of scrapping for the year..
 
Well I may get a chance to have a bit of a play in a few weeks.. but won't be till I have managed to set up myself a space to create.
 
So.. once again I have had some yummy products to play with from Mad About Scrappin.
 
OMG.. when I chose these papers I was in love.. however must say that when I saw the papers in real life they were even better than I had expected. I must say that Leanne find the best products to sell in her store.. AND at such amazing prices too!!!
 
I played around with My Mind's Eye - The Sweetest Thing paper range. I love that they match up so perfcetly and lend themselves to a variety of themes. Most of all I love the fact that they are double sided which means that I have twice as much paper to select from !
 
So.. with a little help from some ink, stamps and some super cute photos of my kidlets I was able to create away to my hearts content with this yummy paper range.
 
 
I love stamps... most of all I love hand cutting. I was able to combine the two by stamping onto the yummy paper range to create my own embellishments which I was able to then layer over some paper flowers. this helped to create dimensions and softened the overall look.
 
I created the base of this layout by stamping onto some recycled card and then "painted" the stamped image to "emboss" it with a thick glue wash. I then sprayed the whole base with multiple layers of glimmermist to highlight the stamped image. Then I rubbed the edges and stamped image with ink to bring it out even more. This created a fun base to work with that matched my papers perfectly.
 
Nothing like a stamping with a clear stamp in your hand rather than a stamp block. I love the effect that I achieve doing this. You get the stamped image but not all of it and just give a hint of the image in the background. I then rub ink over it all lightly to blend it all into the background.
 
Have had so much fun laying with all the products I have received from Mad About Scrappin.
 
Why not head over to the shop and see what Leanne has there at the moment.
 
TFL, Michelle x
Photobucket
Pin It Now!

Tuesday, November 27, 2012

Mixing it up with Bo Bunny

Hello everyone.

Seems like ages since I have been able to share with you things I have created with goodies from Mad About Scrapping.

I love love love all the products that Leanne has for sale in the store.

Being chosen to play along on the design team has been a blessing too as everyone is so much fun to work with.

Now.. part of my design team fun was to pick some goodies to play with. Now.. I must say.. when I first went and picked the Bo Bunny Serenade paper range to play with I didn't actually have these layouts in mind or even the photos I ended up using. (I was actually going to create some masculine layouts)

However while my goodies arrived I was in love. The paper range is SOOOOOOO much nicer in real life than what I thought. Plus must say that I haven't created three layouts as quickly as I did with this paper range. I just had to play and so wanted to just keep creating with this paper range.

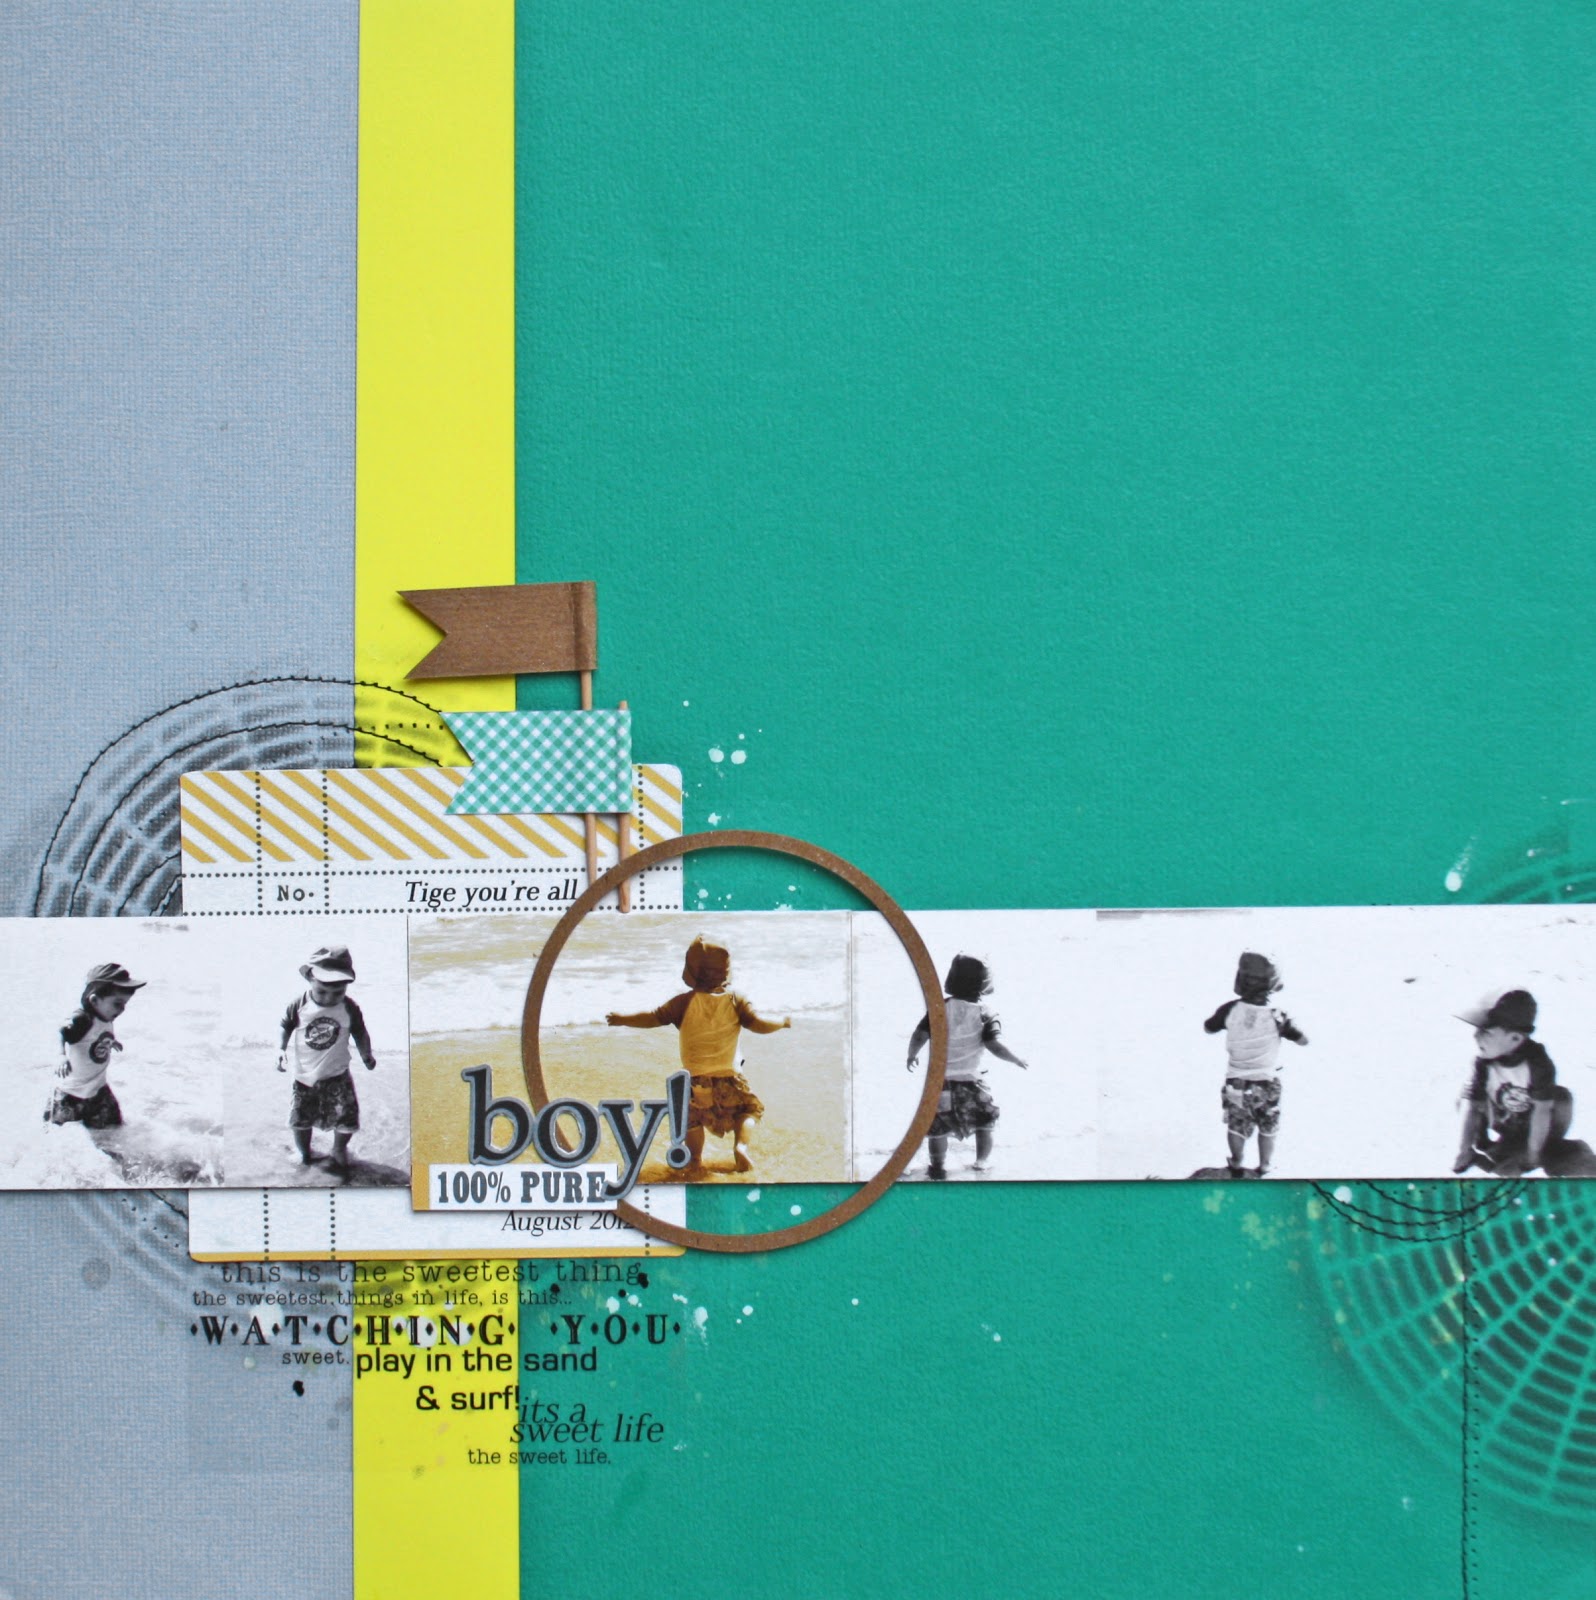
Now for this first layout I did you must be wondering what the multi patterned paper is.. well it isn't one piece of paper that is for sure..lol. As some of you may know I like to think outside the box and challenge myself. So with that in mind I set to work creating the multi patterned paper area on a scrap of card stock. I then cut multiple strips of the mixed patterned papers to 3" x 3/4" in size and adhered them randomly using both sides of the patterned paper in a chevron style pattern. I am most impressed with this idea myself and have repeated this process a few times myself. I have also done it to use up scraps I have had laying around. Quite effective really.
So here's what I have created...
Layout 1


Layout 2

Now with this layout I really wanted to break up the bold papers just a little. I didn't want large blocks of paper and I wanted to be use as many of the patterns papers as possible. So with that in mind I was able to do this by using 4 different sized circle punches. Must say how ever that I didn't create this heart shape free hand. I started by cutting a heart out of scrap card stock and tracing it onto the card stock base where I wanted to heart to be. Then I placed the hearts randomly in the heart shape till I was happy with the mix of patterns and shape. THEN I adhered them down. This gave me a cance to mix the patterns up a bit till I was happy with them. Quite a simple background but so easy to do.
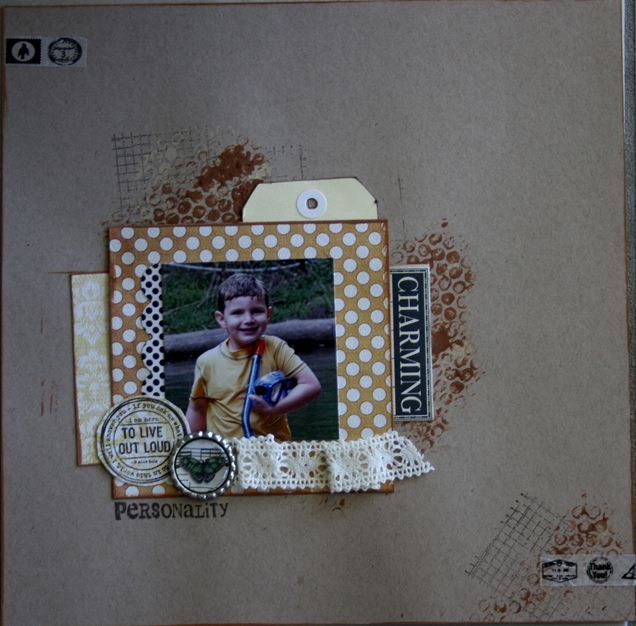
Layout 3


So for the last layout I created .. Yes as you may be able to see I am a little crazy. I had this smart idea to hand stitch all the pieces of patterned paper to the card stock base. I adhered the centre of each of the shapes to the base where I wanted them and then stitched using embroidery floss. It was a little time consuming.. 4 hours of just stitching but found it quite fun.. despite the fact I was stitching through 3 layers of paper and card stock. I am grateful that I pierced all the holes first as it made the stitching a lot either.

Lastly...

And just for a little something to use up a few of the scraps I played around and created a quick card.
Super quick and easy but love the boldness of the colours.

Why not head over to the store yourself and check out all the yummy papers yourself.

TFL. Michelle x

Photobucket
Pin It Now!

Friday, November 23, 2012

MIX IT UP & BE BOLD!

Hi everyone, Em here. Its been a tad too long between post so thought I'd better stop by and share a recent project I did for Mad, so here goes.... I'm not sure what you do with your cardstock left overs but if your anything like me you have a huge stash of cut offs that are too small to use as a base in 8.5x11 page but are too big to toss away.

In this quick little page share I wanted to show you how those off cuts can be simply stitched or adhered together to form a 12x12 base and by also keeping a simple design principle in mind 'Creating a Focal Point'... you can produce an eyecatching design.
 
So after rummaging through my stash of cardstock off cuts I found 3 colours that I wouldn't normally put together but figured they really would grab everyones attention so decided I was game. But before committing to creating the traditional/hybrid page I did a digital version first to see how it would work. 
In the digital version I'm able to play with the placement and widths of each colour. Depending on your choice you can really change the dynamic of your design by lifting it out of the mundane and into something quite dramatic. 

The key is to select one colour, in this instance the pop of 'Yellow' to shock the senses, however by limiting its quantity to less than the others it becomes dramatic rather than over powering. To tie it in even more I introduced some elements in similar yellow tones which helps carry the eye across the band of wallet sized photo's which of course are our main focal point and help soften the whole look.
'100% Boy' {Digital Version}
Digital Credits:
Fresh Kit by Sahlin Studio & One Little Bird
A Bit More Mess Stitching by Amy Martin
Digital Cardstock by Emma Stafrace
Misted Graph by Emma Stafrace
Now that I have worked out the lay of the land in my digital page I created the hybrid version below using the cardstock from my scrap stash that I had originally selected and am really pleased with how it turned out. 
'100% Boy' {Hybrid Version}
Materials:
Cardstock
Studio Calico Graph Misting screen
Distress Ink
Mister Huey's Opaque White Mist
Machine stitching.
NB: One fun tip if you have access to a photo editing program try altering the colour of your photo's. As you can see above by changing the focal photo to a yellow/sepia tone I am helping to tie the yellows together even more.
Hope you enjoyed this quick design tip share and maybe get you thinking more about using the humble cardstock in more exciting and eye catching ways.
For another quick cardstock fix check out an earlier MAS post here.
xox
Photobucket
Pin It Now!

Monday, November 5, 2012

My Minds Eye, Tangorine Collection

Oh My Goodness!!!!! I just love this paper range. It is definitely a must have on your list. My Minds Eye-Tangorine has the most stunning colours, I love the oranges and it was perfect fot the photos I had just taken of me and the boys cutting our very first Pumpkin
 
We had so much fun cutting a Pumpkin, I must be honest I am not a huge fan of Halloween, though my 9 year old son was most determined to get a pumpkin this year. So I decided to try it, it was a lot easier then I had thought, and I just adore these photos of my 2 boys out side with the pumpkin


I just loved using the bling flourishes, I find some bling flourishes to be much to big, so I have formed a bit of a habit of cutting them up to be more of the size that I want. I love this close up and at Mad about scrappin they have an amazing range of flowers. Loved getting different sizes, it makes a cluster look so much prettier when you can have differing sizes and different colours
 Well I hope you enjoyed my layouts, and they have inspired you. I certainly enjoyed creating them (after a few months of no mojo) But I am certainly back into scrapping and can't wait to share some more layouts with you soon.

Photobucket
Pin It Now!

Friday, October 26, 2012

Something very girly

This month the lovely Leanne from Mad About Scrappin sent such a yummy kit to play with that I ALMOST could bear to ACTUALLY cut up the paper in the kit.

However...

I got stuck into it and came up with these two layouts.

I also created a layout for the Mad About Scrappin September challenge too using leftover bits and pieces from the kit.

Why not check out the store and see what other goodies Leanne has for you there.

I guarantee that you will find something there you will want to scrap with.

TFL, Michelle x

Photobucket
Pin It Now!

Monday, October 22, 2012

Creating with templates

Hello everyone.

Back again to share what else I have been busy creating thanks to the yummy goodies sent to my by Leanne at Mad about Scrappin.

This month I got a chance to play around with some templates.

Now I was itching to play with these when Leanne mentioned sending them.

Now.. I haven't personally had much of a chance to play around with templates much myself. I have dabbled with them with embossing and with paint and ink a little. So when I received these templates I decided to challenge myself a little and must say I had a blast playing with them.

For my first layout I played around with two inks. I mixed them together and used one of the templates to create my own patterned card stock. By varying the pressure on my blender I was able to make the pattern come out strongly or fade off just slightly. I also used a pearl ink so that the pattern also has a slight sheen to it when it moves.


Now for the next layout I really made a mess. I absolutely LOVE this clock template. It is now my best friend and I hope to be able to use it over and over. I have really created lotsa layers on this base using the template, recycled card as my base and some texture paste. Now it did take a bit to dry using the texture paste but was SO worth all the effort. Then once that was dry I gesso sprayed it all lightly and misted the whole base with several different glimmer mist colours. So much mess made but so much fun. The template really helps the background pop!

 
Just a quick note to remember too... don't be daunted by templates.. you don't have to use the whole template and mix it up and try things out yourself too.
 
Thanks again Leanne for getting me to play with the templates they were so much fun.
Don't forget to check out the goodies at Mad About Scrappin yourself.
 
TFL, Michelle x
Photobucket
Pin It Now!

Tuesday, October 16, 2012

Teresa Collins-Vintage Finds by Melanie McKenzie

Hi everyone,
 
I've been busily scrapping the  Teresa Collins Paper range, Vintage finds. OMG it is just stunning. Love the colours and love the bingo cards you get with the paper range. Just so easy to use.
This is one of those ranges that you can either rough up with stamping and paint, as I have done. I wanted to use some different textures. .
 
 
Here is an example of the gorgeous little bingo cards that come with the range, and this range has little journalling words, which are great to cut up and use it as part of your journalling as I have done in the below layout.  

 
I loved using this kit,. It is a vintage range, but great colour scheme for the beach with the bieges, and such perfect colours for an older boy as well. Which I find it really hard to find paper for my eldest son. This paper is perfect.

 
Hope you love my layouts, hope they have inspired you, and I hope they make you get your stamps and paint out of your stash and get scrapping.
 
Photobucket
Pin It Now!

Monday, October 1, 2012

Cardstock is the new hero!


Do you have a mounting selection of cardstock sitting in your stash that gives little inspiration? Has your cardstock only ever been used as your base albeit an important role but not very awe-inspiring?

By simply making it the hero product you can create many cool projects using your overlooked scrapbook stash of cardstock. With a little bit of dressing up, you can take your cardstock out of the mundane and breath new life into it!

Over the next few weeks we will be showcasing some very simple and inspiring ways to utilise cardstock and maybe even get you using some of your tools like punches and your cuttlebug that are collecting dust like mine are.

So I hope you will join us in exploring the use of Cardstock and maybe just maybe re-think and re-invent new uses for this humble of scrapbook products.


Project 1
The Fun Fair:
An explosion of colour, shapes and pattern.

Cardstock comes in a wide range of colours covering the entire colour spectrum. There are bright, parchment and pastels including some metallic also available. You can get it in varying textures like linen, canvas or a woven cloth. They also come with an embossed pattern, which is great to add some extra texture instantaneously.

In this project I am going to show you in 3 easy steps how you can create a fun colourful page, filled with lots of pattern and shape without the use of patterned paper and other embellishments. The key is to select a collection of coloured cardstock that energise and evoke a sense of fun and then you are well on your way to creating a masterpiece entirely made of cardstock.

Below is a digital scrapbook page I created as a draft design. I often do this so I can iron out the composition of my designs and then it will become my reference guide to how I create my traditional page. So now that thats done, lets begin…

‘Clowning Around’
Digital Credits:
Embossed and Plain Cardstock Papers by Emma Stafrace
Essential Digital Stitches: C Smith Designs
Word Art: Foto WordMix No.1 by Anna Aspnes
Alpha: Blue Illusion by Kaye Winiecki

Step 1:
Using your Cuttlebug and embossing folders to depress a textured pattern on various coloured cardstocks. Making sure you use many different patterned folders to add a variety 
of raised impressions on your cardstock.

Step 2:

Cut the embossed cardstock into different the shapes of your choice. I am cutting mine into diamond shapes which were inspired by the bright and colourful lights at a recent travelling road show my family and I went to.

Step 3:
After adding some inked areas using a Crafters Worshop template I included some  customized word art by creating my own using a product called Grafix –Rub Onz. The great thing about this product is you can stamp, paint and draw on it so its versatitlity is fantastic. (To see how to use it check out a tutorial on how to use that here on my blog). Then I positioned the pre- embossed and cut diamond shaped paper discs to the base cardstock.

Step 4:
Once the cardstock diamonds were adhered to the base I ran some straight stitching in vertical rows running through the centre of each grouping this not only fixed them more permanently to the base cardstock it also added another element without being too overwhelming. And finally after printing off the title it was included to finish off the page. 

So there you have it I hope you enjoyed this really fun and easy look at creating with cardstock and perhaps inspired you to use it as your hero material in future projects.

Em Stafrace


Photobucket
Pin It Now!