Friday, January 30, 2015

Creative Inspiration - Week 5 2015


Hello again everyone.

Back this week to share with you the last framed layout I created as part of the donated scrap booking vouchers for my girls Calisthenics team. 

This would have to be my favorite of the two framed layouts I created. 

Here's the finished framed layout.
This framed layout features a lot of texture and dimension. I have used an older paper range that I had sitting in my stash.  

I have used a mix of card stock, paper doily and matching patterned paper to create the starting depths in this layout. I created the pennants using wood veneer shapes and covered them with the matching paper. I have then clustered them together using a mix of flowers from many Mad About Scrappin sales. I have been lucky enough to be able to get quite dimensional with the flowers as the frame is in a shadow box format.

You can see a bit more of the background here where I have used a stencil to mask the base card stock with a chicken wire fence look with white wash. I then hit the whole lime green card stock with some glimmer mists to match in aqua and melon. I finished off the floral clusters with some mixed pearl and clear sequins. They add a bit more of a feminine touch.

Here is a close up of the digital stamped 3x4 and 4x6 cards I created from some of the matching patterned paper. I finished the layout off with a mixed title using some acrylic alphas and some aqua glitter alphas.

I love how this turned out and am glad I have been collecting all my bits and pieces at every Mad About Scrappin online sale. It make creating easier when I have exactly what I need.

Have you played around with creating something different to what you normally create lately ?

Why not get creative this weekend.

Till next week.

TFL, Michelle x


Photobucket
Pin It Now!

Monday, January 26, 2015

Altered Hessian/Burlap Canvas

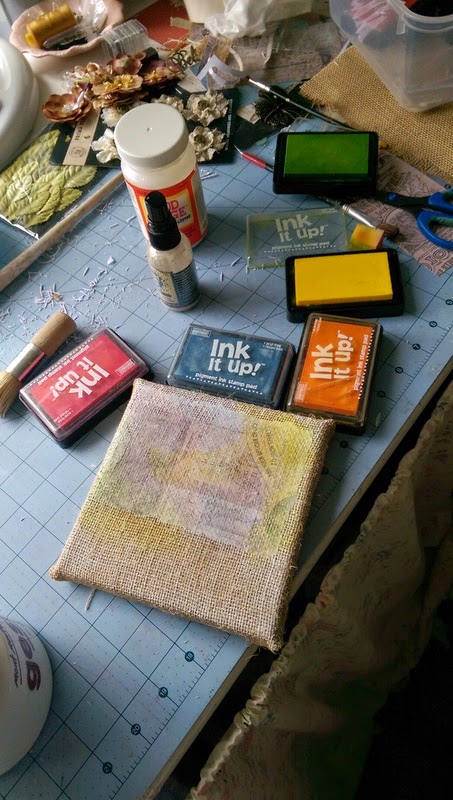
Hello again everyone and HAPPY AUSTRALIA DAY to all my Aussie readers.  I hope you have had a fantastic day wherever you are in our great southern land.  Today,  I have a little altered canvas to share. This was a pretty quick and easy project.  I have just covered a 6x6 art canvas with some natural hessian/burlap and with hubby's help stapled it all to the back.

I have taken some scraps from last weeks file folder mini album and ripped the edges.  
I was after a thinner, more tissue look to the paper so I have gently rubbed the back of the paper with a baby wipe to dampen the paper.
Then I used my finger to gently rub the layers away.
I kept doing this till I had a chieved the look I was going for.  Be careful doing this guys...I rubbed a little to hard in places and actually ended up with a few holes, which wasn't any major drama really as I was going for a vintage/distressed look.
Once I was done I set the paper aside to dry and set to work on the hessian canvas.
I gave the edges a dry brush with some diluted gesso.....
Then a liberal coating of Mod Podge...
I also gave the paper a liberal coating too ;)
I then VERRRRRRY gently lifted the paper and adhered it to the canvas and applied another generous coat of Mod Podge....
I let this soak for a little bit, then grabbed my stipple brush and began to pounce the paper into the weave of the hessian.


I set this aside to dry.  Lucky it is summer down here and I didn't have to wait too long before I could get back to creating....Once it was dry I added some gesso - undiluted this time - to the edges

and then it was time to get inky with it...I pulled out some of my pigment ink pads and added some colour.

Then spritzed it with some Perfecr Pearls Mist - Biscotti.  I love this stuff and use it all the time...It adds a nice shimmer with changing the colours too much...  I also love how as it soaks in it blends the pigment inks together.
My next step was to add a generous coat of gesso to  an antique filligree butterfly

and spray it with some Lindy's...but I wasn't that happy with the colours, so I ended  up using some alcohol inks in aqua and pink sherbert, whic you will be able to see in the glamour shots below.
I have cut some flowers using the Tim Holtz, FLower Garland die and coloured them with the pigment inks

Then I began to play with the layout.....added some rubons, washi tape and some vintage ephemera that co-ordinated with the Madame Payroud collection.  I have added a saying, and the chipboard word came from one of my previous kits.

Once I was happy with where everything went I quickly glued everything down before I changed my mind....I also printed off the saying, inked up the word strips with some Tim Holtz distress inks in Tea Dye and Walnut Stain.


So readers here are all her "glamour" shots......


I do hope you have enjoyed my little altered canvas today and I hope have inspired you all to dive into your stash and play around with what you have!!  Thanks for stopping by and don't forget to check out all the Mad About Scrappin links below.


✿ღ.~♥  Much Love ♥~ღ.✿
Photobucket
Pin It Now!

Friday, January 23, 2015

Creative Inspiration - Week 4 2015


Hello all.

This week I am sharing with you something a little bit different on behalf of Mad About Scrappin.

Last year I donated two scrap booking vouchers to my girls Calisthenics Clubs raffle. I offered the winner a framed 12x12 layout of a 4'x6' photo of their choice. However..for both of the winners I did end up creating two layouts. Just couldn't help myself !

So this week I am showing you the first of the two framed layouts I have created for one of the lucky winners.

I love how this came out. It was a little bit of challenge at first as the photo had been laminated and was originally A4 in size. Plus the quality of the photo wasn't the best so this involved a little bit of mucking around with the photo in Photo shop Elements to get it to a quality I was happy to scrap with.

So here's the full framed layout I created.

I have started with a base card stock of bright lime green card stock to mat the slightly smaller cobalt blue card stock. Its a little hard to see but the cobalt blue card stock has been embossed with pearl coloured embossing powder using a script stamp as the pattern. 

I have used a mix of patterned paper and some patterned tags from my stash as the base for this layout.I have also used a mix of flowers from Mad About Scrappin and some from my stash to cluster together on the top and both of the layout.

You can see in this photo a bit of a closer photo of the the digital stamps I have used to print onto some white card stock I had cut to 4x6 in size. I have then added some doilies from my stash as the base for the clusters of flowers on the layout. I have then finished off the layout using some pearl coloured sequins to add that little bit of sparkle. 

I have then framed the whole layout using a 12x12 shadow box frame. This means that I have been able to be fairly dimensional with the layout and know that the whole layout is protected by the clear pvc front to the frame.

I have quite enjoyed creating this layout.

Well.. back to some spend family time with my kids.

Till next week.

TFL, Michelle x

Photobucket
Pin It Now!

Monday, January 19, 2015

File Folder Mini Album

Hey all, Welcome back!  Today I have a real quick mini album to share.  I have used the last of my Madame Payraud design team kit from last year.  I have seen heaps of these cute little mini over on youtube and thought it was high time I give try my hand at one.

I have used 2 foolscap cream coloured manilla folders and some vintage ephemara that I printed off from the internet. 

 Well guys I don't really have much to say, so I will let the pictures do the talking for me.....


 I really loved how this little mini turned out...very vintage-y.  I willd efinitley m=be making a few more of these as soon as I have restocked my file folders!! :)  As always thanks for stopping by, I hope you have enjoyed my mini as much as I did creating it.  Please be sure to check out the links below to see what my other creative team mates have been up to...

....remember to live your bliss......
✿ღ.~♥  Much Love ♥~ღ.✿

Photobucket
Pin It Now!